
Mount Kilimanjaro in Pictures (by Skyhook's Alison Macallister)
In February this year, I finally got to tick off a major bucket list item: climbing Mt. Kilimanjaro!
I chose the Machame 7-Day route based on its diverse scenery and, most importantly, its slow and steady acclimatisation profile.
Here's what I learned along with a photo essay of my experience. Hopefully, it will inspire and help out those of you who are thinking about taking on this extraordinary adventure!
Machame Route: My Story of Kilimanjaro in Images
18th February - Hello Moshi!
My flight with Precision Air (which is anything but precise) arrived around 9:30 AM at Kilimanjaro International Airport (JRO). A huge perk of flying to JRO from Kenya is a preview of Kili’s summit from the air. Admittedly, this was also slightly intimidating realising that in just a few days' time, I’d be making my way to that crater above the clouds on foot!

JRO airport is very small. Before you enter, there is a booth to check yellow fever vaccination cards (only required if you're coming from a region with high risk).

Most nationalities require a USD$50 visa to enter Tanzania. While it's possible to get one on arrival, I recommend applying for an online visa before travelling.
After picking up my luggage, I was welcomed by my driver, Anton. Since the rest of the group had a later pickup, we could head to Moshi right away. On route, I chatted with Anton about Tanzania and his work as a safari and trekking guide (which he was clearly passionate about).

Weru Weru River Lodge (where Skyhook guests stay on either side of their trek) is just outside Moshi, about one hour from the Airport. As soon as we pulled up, the hotel staff greeted me warmly and offered me a refreshing drink.
I was a little early for check-in, but luckily, my room was ready (although it was tempting to sit down for lunch or take a dip in the pool first!). I had some time to rest before our group gathered later in the afternoon for the pre-trek briefing.

At the briefing, Holyfield (who handles all of Skyhook's bookings) introduced our group to Bryson, our head guide, and go-to guy for the next few days.

After the briefing, we returned to our rooms for a quick gear inspection. Even though there'd been plenty of time for me to check and sort out my packing list, it was still good to have an expert pair of eyes confirm that I had everything needed.
Note: If you're missing anything at this point, you can still arrange to rent it from your guide. They’ll bring it with them when they pick the group up the next morning.

Day 1: Machame Gate to Machame Camp
Our group was up and ready by about 7:00 AM for breakfast. As instructed, we’d already packed our bags the night before. We dropped our extra suitcases safely with a reception in time for Bryson to pick us up at 8:30 AM.

After another hour plus of driving along winding narrow roads through small villages and banana plantations, we arrived at Machame Gate. Things became very real as Bryson signed us in.

We spent some time waiting around, watching the cheeky grey monkeys steal food as the porters packed supplies and weighed the bags. We then collected our packed lunch for the day and had the chance to fill up our bottles and water bladders.

We finally hit the trail around 11:00 AM. The first part of the trek is steep, leading up through the lush rainforest on Kilimanjaro’s foothills.
It was a little humid but not so much as to be uncomfortable as you are under the shade of the forest canopy. Hundreds of porters bustle along and overtake you as you hike, seemingly unbothered by heavy loads of gear.

Even with all the foot traffic, the rainforest is peaceful and beautiful. Birds call from all directions, and Bryson pointed out a dassie (tree hyrax) and white colobus monkeys in the branches above. There was also a sneaky genet looking for scraps at our lunch stop.
This first day is a tough 11km upslope. Machame camp was a welcome sight as we arrived late afternoon. Reaching camp is a dramatic change of landscape as the rainforest suddenly gives way to tree ericas in the Moorland zone.

It’s a treat to arrive at an already set-up camp, complete with hot tea, coffee and popcorn waiting for us in the dining tent. After the warm refreshments, we had a little time to relax before dinner. Our camp team provided small basins of water to wash off a little. Bryson joined us to eat and discuss the next stage of the trek.

Day 2: Trek to Shira Cave Camp
After a surprisingly good night of sleep, I woke up feeling ready to take on the day!
Our wake-up call at 6:00 AM included coffee delivered to the tent (did I mention the team is amazing?!). Once packed, we gathered for a hot breakfast and were ready to get going by 7:30 AM.

Day two of Machame is a tough one as almost the entire section is steep and rocky. It’s only about 5.5km to Shira camp, but it takes around 6hrs to cover this short and steep section.
The motto on Kilimanjaro is ‘pole-pole’ (slowly, slowly), and you will hear these words uttered almost religiously along the trail. Even the fittest of hikers need to keep a slow pace to give your body a good chance to acclimatise.

Despite the steep profile of this day, I really enjoyed this section of the hike as there were multiple look-out points to rest a bit and take in the views.

By early afternoon, a fog had set in giving Shira Cave camp and the surrounding plateau an eerie appearance.

Later in the afternoon, our guides, porters, camp assistants, and kitchen team gathered in camp for a song and dance. This is a fun Kilimanjaro tradition to officially welcome trekkers to the mountain and also to meet your full team.


Latest Deals
Day 3: Up to Lava Tower and Down Again to Barranco Camp

At 3,750m above sea level, I’d started to feel some of the effects of altitude, including a restless night of sleep. The others reported a similar experience and we were all a little quieter as we set off across the plateau towards Lava Tower.

The morning air had a chill to it. On the previous days of trekking, I’d gotten away with shorts and a t-shirt, but today was time to embrace the layers!

It’s a fairly gradual slope towards the lunch point at Lava Tower, but with the thinner air, each step of the day's 7km trek can be a challenge! At this point, hikers from the Lemosho route join the trail so there are considerably more people around.

Lava Tower is an iconic rock feature sitting at 4,600m. Hikers must ascend to this tower for lunch before heading down again to camp at Barranco, which is significantly lower.
The altitude at this lunch stop is good practice and a test run of how your body will hold up to even higher elevations.

The high altitude can make it difficult to work up an appetite. As we force-fed ourselves mouthfuls, it was a relief to start to feel a little better. Any altitude symptoms are quickly relieved when you leave Lava Tower and make your way down into the valley.

The descent through the valley to Barranco Camp was an experience in itself. Huge, alien-like Senecio trees mark the trail, and small waterfalls flow down the rocky landscape. I was not the only hiker stopping every two minutes to take pictures.

Finally, at camp, we were lucky to have a calm and mild afternoon. I watched the last rays of sun light up Ururu Peak as the mighty Barranco Wall cast its shadow over the clusters of tents.

Day 4: Barranco Wall and on to Karanga Camp
Despite its intimidating appearance, the Barranco Wall is not as scary as you may have heard. The narrow trail zig-zags, and for most of the way, you are simply walking or stepping over rock. There are a few sections where you need to use your hands and do a bit of a scramble, but it’s nothing too technical.

Even so, it generally takes about two hours to get over this rocky stretch. We left camp early to avoid getting stuck in a queue of trekkers moving in a single file.

The top of this wall is marked by a spot known as Breakfast Rock. Here we found the very welcome sight of Joseph (our camp waiter) ready for us with hot cocoa, coffee, tea and cookies.
Hot drinks and sugar went a long way in restoring our energy levels for the last leg to Karanga camp.

When you get over the wall, the landscape becomes dry and desolate. By the time we ascended out of the final steep valley to Karanga, we were feeling pretty exhausted, not to mention wind-beaten!
I was grateful at this time not to be doing a 6-Day Machame trek, in which case we would have stopped for lunch and then continued a few more kilometres to Barafu.
Karanga sits 3,995m above sea level. Our group was tired as we shared a quiet dinner and our standard evening briefing with Bryson.

Back in the tent, the wind blasting against the canvas made it difficult to get a full night’s rest. Fortunately, the next day would be a very short trek.
Day 5: Trek to Barafu/ Base Camp
Contrary to my hopes, the wind continued to gale the next morning. As it was a short hike (approximately 3km), we got up a little later to start our trek to base camp.
The dining tent had not survived the night and needed to be re-erected before the usual generous breakfast spread could be served.

By the time we were ready to go, there was already a steady stream of hikers making their way out of camp.
The wind made it impossible to do anything except concentrate on putting one foot in front of the other. I was glad for my buff, which at least kept some of the chill off my face.

The landscape near Kilimanjaro's peak is barren and rocky. No plants survive this high up, and there is no shelter from the elements.
Fortunately, at a steady trudge, we made it to base camp in just a few hours.

Barafu camp is huge, exposed, and very steep. Almost 700m higher than Karanga, the wind was even wilder here. Due to the short distance, we arrived around the same time as our porters (a first!).
Feeling a bit doubtful whether tents could withstand this weather, we waited for our team to discuss campsites. Eventually, it was decided to set up on the lower part of the camp.
It would mean adding 15 minutes to our summit hike, but ultimately, it was the better choice as the wind was a good few knots stronger at the top of camp.
We followed Jeremiah to the sign-in hut at the top of camp and then returned to admire the team's persistence and skill in getting the tents set up.

Today was all about resting in preparation for a near-midnight summit bid. We still had a few hours to close our eyes and attempt to nap before lunch was served. Then it was back to the tents before another meal and a final briefing on our mission ahead.

Day 6: Uhuru Peak and Down Again
At dinner, it was decided that the group would split for the ascent. The guides make this decision based on how everyone is feeling and has been doing up to this point. My trek would begin at 2:00 AM.

After very little sleep, I was woken by the customary coffee and snacks in the tent. The dining tent had been disassembled the night before to prevent it from blowing away. I sipped my coffee and chewed on a muffin before putting on my many layers of pants, tops, and jackets, preparing for sub-zero temperatures.
Finally, it was time to hike to the highest summit in Africa!
With our headlights guiding the way, we slowly trudged up through camp towards the final slopes. Most of the other hikers had already started and you could see a string of lights up to Uhuru.
I had been feeling fairly good over the last few days of hiking, but on the summit morning, the altitude finally hit me. Altitude, combined with physical exhaustion and getting very little sleep over the past few nights, meant I was far from my best.
Fortunately, I had mentally prepared for this discomfort and keeping Bryson’s words from the previous evening ("it will all be over in a few hours") in mind, I stuck it out, one small step at a time.

Moving at a slow but steady pace, it took me around 6.5 hrs to reach the top. In the dark of night, time flowed differently. The experience had been an emotional and physical rollercoaster and it felt much longer at times, while the last section between Stella Point and Uhuru went by in a flash.
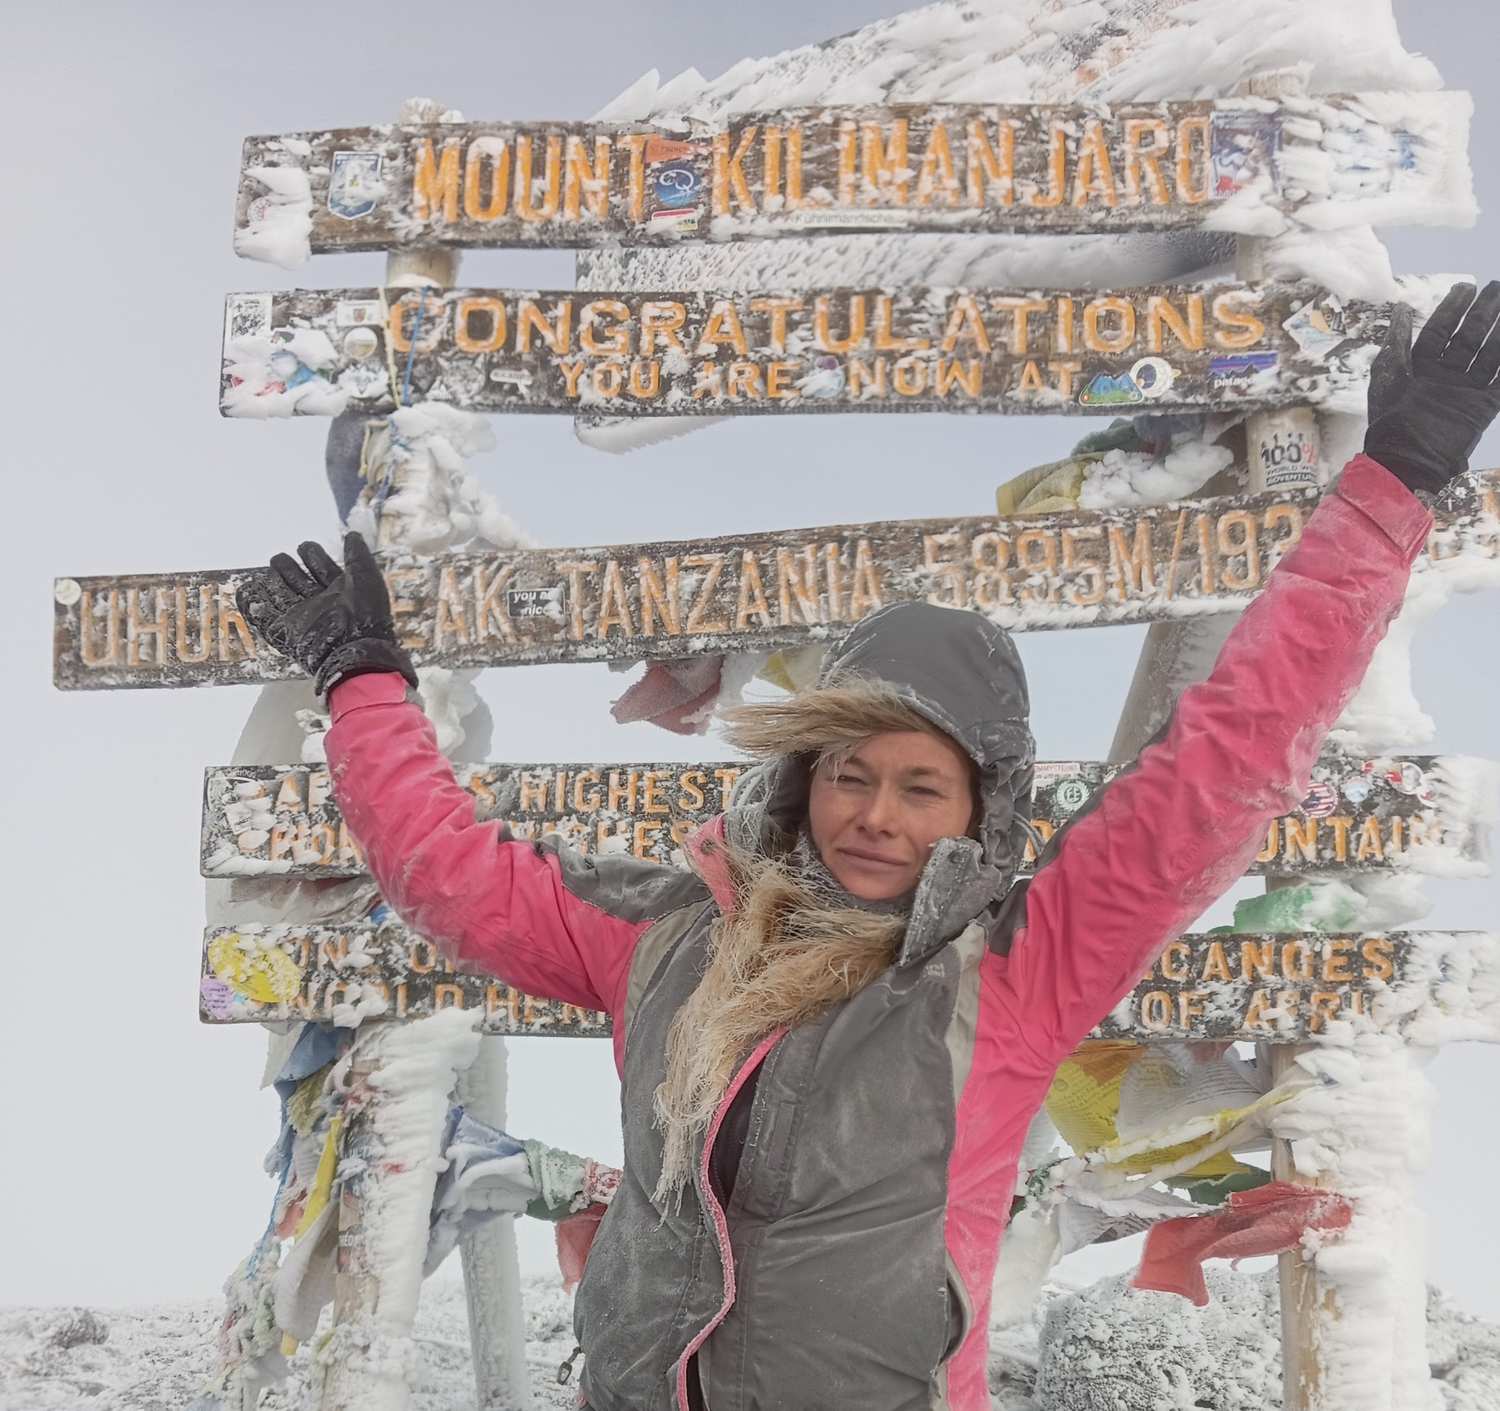
The cloudy, snowy conditions meant there would be no sunrise summit pic this time round!
As much as you think you’ll want to hang out on top, take photos, and enjoy the view, it’s usually freezing cold (it was somewhere around -15C), and with oxygen levels below 50%, your body is pretty much begging you to head down as soon as possible.
What people don’t tell you is that descending from Uhuru has its own challenges.
You take a different route down over deep, loose gravel slopes. If you are not prepared to ski down at speed (trekking poles come in handy for this), it's going to be a slow and painful descent.
The fine sand on this section also tends to get into and irritate your eyes so be sure to keep your sunglasses on. Overall, this was not my favourite part of the hike!

After a rest and meal back at base camp, we continued down to High Camp, which is much lower and gives your body a chance to recover from the altitude symptoms.
After resting and regaining some of my bearings, I was able to reflect on this incredible feat and appreciate how fortunate I was to have made it to the highest peak in Africa.
Day 7: Trek down to Mweka Gate
After one of the deepest night's sleep of my life, I woke up for a final breakfast prepared by our amazing team.

Once we'd eaten and packed, we began the 13.5km trek down to Mweka Gate, which would mark the end of this unbelievable adventure.


That's my story of Kilimanjaro in pictures. After my trek, I went on a Tanzania safari organised through Skyhook's local safari operators. But that's another story for another blog post. Watch this space - I'll share the details soon.
If have any questions about trekking this mighty mountain, feel free to contact me through Skyhook.
I'd also recommend joining our Kilimanjaro Q&A Trekking Community on Facebook. Myself and Mark are active on the group and will happily answer your questions.
Want to read up more about the Machame route that I hiked? Check out our comprehensive guide to the Machame route.
Find your next adventure


Why Skyhook?
Join over 31,000 Skyhook adventurers who've used our platform to book directly with our vetted local guides, at local prices (we never markup).
Expert Local Guides
Experienced local guides, handpicked by us.
Best Prices
Never pay a markup on the local guide's price.
Exclusive Club
Earn loyalty rewards every time you travel.
Great Social Vibes
Small group tours provide a richer experience.
Stellar Feedback
Over 3,600 reviews, average of 4.9/5 stars.